Scanning Radio AKA Ghost Box – Installment 3
Project Overview
This is part 3 of a DIY Scanning Radio Ghost Box series using an Arduino Uno which was launched on Twitter as part of the Bread Boards & Bill series.
Prior to continuing forward the steps in DIY Ghost Box Installment 1 and DIY Ghost Box Installment 2 need to have been completed.
In this installment we are adding more features and improving the functions for the software and hardware.
Future installments will build upon the steps in these instructions.
Reference
The following is the pdf version of these instructions which includes additional information and tips beyond the instructions in this web guide.
Materials Needed
This section will require a loading a new sketch to your Arduino and completion of DIY Ghost Box part 2.
- Download and un-zip this file to your PC. This file contains GB.exe (Windows Software) and ghostbox_ver301.ino
Building
Hardware Setup
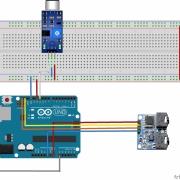
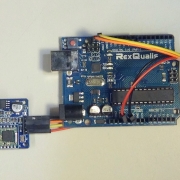
This project uses the build from part 2, no additional hardware is required.
Source Code
- Use the link below to download the new Arduino program file or cut and past from the code below.
- Save it to your computer and open in the Arduino IDE editor (the file is in a zip format.).
Part 3 Arduino source code zip file
//******************************************************************************************
// Ghost Box program scans up then down flashes led on UNO indicates sweeping
// Microphone add and new library Mutes while not scanning
//*********************************************************************************************
/// \file  TestTEA5767.ino
/// \brief An Arduino sketch to operate a TEA5767 chip based radio using the Radio library.
///
/// \author Matthias Hertel, http://www.mathertel.de
/// \copyright Copyright (c) 2014 by Matthias Hertel.\n
/// This work is licensed under a BSD style license.\n
//
//  Sketch modified for the Simple ghost box project 1/20/2022
//  added functions for serial interface software "BETA"
//
//*********************************************************************************************************
//  Includes
//*********************************************************************************************************
#include <radio.h>                                     // Library
#include <Wire.h>                                      // SLC SDA communications for radio module
#include <TEA5767.h>                                   // Tells Radio library how to interface the radio module
TEA5767 radio ;                                        // Define radio model
//*********************************************************************************************************
// Global Variables
//*********************************************************************************************************
int LED1 = 13;                                        // create a name for led1 on the arduino
int hold = 50;                                        // hold is the delay time
int inc = 20;                                         // How far to move when tunning
int start_FM = 8790;//8790                            // US FM Band start **87.7 excluded
int stop_FM = 10790;//10790                           // US FM band stop
int breadboard = 12;                                  // power pin to breadboard
int mic = 11;                                         // microphone signal
int AntIn = 0;                                        // antena energy value 1 count = 1.1 / 1024 = .0010 volts
int scom;                                             // serial input
int mute = 1;                                         // loop mute
int sdir = 7;                                         // scan direction
int swsp = 0;                                         // speak when spoken to 1 on 0 off
int antst = 0;                                        // Antenna start scan 1= on 0 = off
int antlv = 800;                                      // Antenna levelk to start
int atsc = 0;                                         // Antenna Scan on or off 1= on
int atc = 0;                                          // Active tunned frequency
int mtune = 0;                                        // Manual tunning 1= on 0 = off
int hld = 0;                                          // hold till clear
//*********************************************************************************************************
// Program Setup
//*********************************************************************************************************
void setup()
{
pinMode(LED1, OUTPUT);                               // led on board led
pinMode(breadboard  , OUTPUT);                       // breadboard power
Wire.begin();                                        // start IC2 communications
digitalWrite(breadboard, HIGH);                      // power ON breadboard
radio.init();                                        // Start radio
radio.setMute(1);                                    // Mute ON radio sound off
delay(10);                                           // allow breadboard to power ON
Serial.begin(115200);
}
//*********************************************************************************************************
// Main program
//*********************************************************************************************************
void loop()
{
while (!Serial.available())
{
if (mtune == 0)                                   //  mtune
{
if (mute == 0)                                  //  mute
{
int a = 0;
if (swsp == 1)                                 //  swsp
{
while (a == 0)
{
delay(5);
a =  digitalRead(mic);
}
delay(500);
}
if (antst == 1)
{
AntIn = analogRead(A0);                            // read energy on antenna
delay(10);
while (AntIn <= antlv)
{
AntIn = analogRead(A0);
delay(10);
}                                             // read energy on antenna
}//ant tune antenna start speak when spoken start
radio.setMute(0);                                 // un-mute the radio and allow it to scan
if (atsc == 1){scan_by_ant();}                    // if antenna scan is on
if (sdir != 6 and atsc == 0){scan_up_band();}     //scan up on
if (sdir != 5 and atsc == 0){scan_down_band();}   //scan down on
} // muteoff
} // mute = off
if (mute == 1) {radio.setMute(1);}   // set mute
} // mtune = 1
if (Serial.available() > 0)
{
scom = Serial.readString().toInt();
Serial.flush();
}
switch (scom)
{
case 1: mute_off(); break;     // mute off
case 2: mute_on(); break;      // mute on
case 3: speak_on(); break;     // speak on
case 4: speak_off(); break;    // speak off
case 5: scan_up(); break;      // scan up
case 6: scan_down(); break;    // scan dn
case 7: scan_all(); break;     // scan up/dn 'all'
case 8: increment(); break;    // inc
case 9:  hld1(); break;          // hold
case 10: ATon(); break;        // Antenna on / off
case 11: AToff(); break;       // Antenna on / off
case 12: ATOUT(); break;       // Antenna voltage
case 13: Fstart(); break;      // fre-start
case 14: Fstop(); break;       // fre-stop
case 15: hold_on(); break;     // Freq change by antenna
case 16: hold_off(); break;    // Scan direction change by Antenna
case 17: actune(); break;      // Active tunning
case 18: mtune_off(); break;   // manual tuning mode
case 19: mtune_on(); break;    // manual tuning mode
case 20: antscan_on(); break;  // antenna scan
case 21: antscan_off(); break; // antenna scan
default: delay(1);             // end test
} // case select end
} // loop end
//*********************************************************************************************************
// End of main loop
//*********************************************************************************************************
// Sub routines
//*********************************************************************************************************
void mute_off() {
radio.setMute(0);  // un-mute the radio and allow it to scan
mute = 0;
}
void mute_on() {
radio.setMute(1);  //Serial.print(1);                                 // un-mute the radio and allow it to scan
mute = 1;
}
void speak_on() {
swsp = 1; // speak on
}                 // speak when spoken to 1 on 0 off}
void speak_off() {
swsp = 0; // speak off
}
void scan_up() {
sdir = 5; // scan up
}
void scan_down() {
sdir = 6; // scan dn
}
void scan_all() {
sdir = 7; // scan up/dn 'all'
}
void increment() {} // inc
void hld1() {}      // hold
void ATon() {
antst = 1; // Antenna on / off
}
void AToff() {
antst = 0; // Antenna on / off
}
void ATOUT() {} // Antenna voltage
void Fstart()// read input for start
{
while (!Serial.available()) {}
start_FM = Serial.readString().toInt();
Serial.print(start_FM);
}// fre-start
void Fstop()
{
while (!Serial.available()) {}
stop_FM = Serial.readString().toInt();
Serial.print(stop_FM);
}// fre-stop
void hold_on() {hld = 1;} // Hold on
void hold_off() {hld = 0;} // Hold off
void actune()
{
while (!Serial.available())
{
delay(1);
}
atc = Serial.readString().toInt();
radio.setFrequency(atc);
radio.setMute(0);
Serial.print(atc);
} // actual tunning
void mtune_off() {
mtune = 0; // mantune
}
void mtune_on() {
mtune = 1; // mantune
}
void antscan_on() {
atsc = 1; // antenna scan on
}
void antscan_off() {
atsc = 0; // antenna scan off
}
void test_hld()
{
while (hld == 1)
{
if (Serial.available() > 0)
{
scom = Serial.readString().toInt();
Serial.flush();
if (scom == 15){hold_on();}
if (scom == 16){hold_off();}
}
delay(10);
}
}
void scan_by_ant()
{
AntIn = map(analogRead(A0), 0, 1024, 8790, 10800);                      // read energy on antenna
digitalWrite(LED1, HIGH);                         // led ON
radio.setFrequency(AntIn);                        // Set radio to new frequency
if (Serial.available() > 0) {return;}
delay(hold / 2);                                  // wait here for 1/2 of hold
digitalWrite(LED1, LOW);                          // led OFF
delay(hold / 2);
if (mute == 0) {Serial.print(AntIn);}
test_hld();
}
void scan_up_band()
{
for ( int r = start_FM; r <= stop_FM; r = r + inc)
{
digitalWrite(LED1, HIGH);                         // led ON
radio.setFrequency(r);                            // Set radio to new frequency
if (Serial.available() > 0) {return;}
delay(hold / 2);                                  // wait here for 1/2 of hold
digitalWrite(LED1, LOW);                          // led OFF
delay(hold / 2);                                  // wait here for 1/2 of hold
if (mute == 0) {Serial.print(r);}
test_hld();
}//scan
}
void scan_down_band()
{
for ( int r = stop_FM - inc; r >= start_FM + inc; r = r - inc)
{
digitalWrite(LED1, HIGH);                        // led ON
radio.setFrequency(r);                           // Set radio to new frequency
if (Serial.available() > 0) {return;}
delay(hold / 2);                                  // wait here for 1/2 of hold
digitalWrite(LED1, LOW);                           // led OFF
delay(hold / 2);                                  // wait here for 1/2 of hold
if (mute == 0) {Serial.print(r);}
test_hld();
}//scan
}
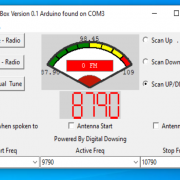
Example Python code using Python version 3.3. Python is an open source project that works on many different platforms.
import tkinter as tk
import tk_tools
from tkinter import ttk
import warnings
import serial
import serial.tools.list_ports
import time
from tkinter.messagebox import showinfo
arduino_ports = [
p.device
for p in serial.tools.list_ports.comports()
if 'Arduino' or 'CH340' in p.description  # may need tweaking to match new arduinos
]
if not arduino_ports:
raise IOError("No Arduino found")
if len(arduino_ports) > 1:
warnings.warn('Multiple Arduinos found - using the first')
arduino = serial.Serial(arduino_ports[0],baudrate=115200, timeout=.1)
root = tk.Tk()
root.title("Ghost Box Version 0.1 Arduino found on "+str(arduino_ports[0]))
g = 0
h1 = 0
x = 1
ra = 0
n = 16
def ts(v):
root.title(str(v))
def tc():
root.title(txt.get())
first = 0
last = 500
txt.delete(first, last)
def fc1(): #3 or 4 swsp on off
arduino.write(bytes(str(var1.get()), 'utf-8'))
def fc2(): # antenna start on/off 11 12
arduino.write(bytes(str(var2.get()), 'utf-8'))
def fc3(): # antenna start on/off 20 21
arduino.write(bytes(str(var3.get()), 'utf-8'))
def fl():
#var1 check box
#global g
if vr.get() == 1:
g = 5
arduino.write(bytes(str(g), 'utf-8'))
if vr.get() == 2:
g = 6
arduino.write(bytes(str(g), 'utf-8'))
if vr.get() == 3:
g = 7
arduino.write(bytes(str(g), 'utf-8'))
def rf(): #stops happy fingers button M
m.config(state='active')
def rr():#stops happy fingers button E
e.config(state='active')
def manual_on_off():
global h1
e.config(state='disabled')
if h1 == 1:
h1 = 0
g = 18
arduino.write(bytes(str(g), 'utf-8'))#off
led2.to_green()
time.sleep(.25)
else:
h1 = 1
g=19
arduino.write(bytes(str(g), 'utf-8')) #on
led2.to_green(on=True)
time.sleep(.25)
root.after(50, rr)
def mute_on_off():
global x
m.config(state='disabled')
if x == 1 :
x = 2
led.to_green(on=True)
arduino.write(bytes(str(x), 'utf-8'))
time.sleep(.25)
else:
x = 1
led.to_green()
arduino.write(bytes(str(x), 'utf-8'))
time.sleep(.25)
root.after(50, rf)
def hold_on_off():
global n
m.config(state='disabled')
if n == 16 : #on
n = 15
led1.to_green(on=True)
arduino.write(bytes(str(n), 'utf-8'))
time.sleep(.25)
else:
n = 16 #off
led1.to_green()
arduino.write(bytes(str(n), 'utf-8'))
time.sleep(.25)
root.after(50, rf)
def wtf():
data = str(arduino.readline(), 'utf-8')
arduino.flushInput()
dtm = data.split("*")[0]
if dtm.find("*") == -1:
if len(dtm) >=4 :  # strip nul string from library debug *1234
dv = int(dtm.strip())/100
z.set_value(str(dv))
p.set_value(dv)
root.after(50, wtf)
#radio buttons
vr = tk.IntVar()
vr.set(3)
rb = tk.Radiobutton(root, text="Scan Up   .", variable=vr, value=1, command=fl)
rb.grid(row=0, column=2, sticky='NW')
rb1 = tk.Radiobutton(root, text="Scan Down ", variable=vr, value=2, command=fl)
rb1.grid(row=0, column=2, sticky='W')
rb2 = tk.Radiobutton(root, text="Scan UP/DN", variable=vr, value=3, command=fl)
rb2.grid(row=0, column=2, sticky='SW')
#checkbox
var1 = tk.IntVar()
c1 = tk.Checkbutton(root, text='Speak when spoken to', variable=var1, onvalue=3, offvalue=4, command=fc1)
c1.grid(row=8, column=0)
#checkbox
var2 = tk.IntVar()
c1 = tk.Checkbutton(root, text='Antenna Start', variable=var2, onvalue=10, offvalue=11, command=fc2)
c1.grid(row=8, column=1)
#checkbox
var3 = tk.IntVar()
c1 = tk.Checkbutton(root, text='Antenna Scan', variable=var3, onvalue=20, offvalue=21, command=fc3)
c1.grid(row=8, column=2)
# slider
#w = tk.Scale(from_=8790, to=10790, command=ts)#, relief='sunken'
#w.grid(row=0, column=0,sticky='nse')
#horizontal slider
#s = tk.Scale(from_=0, to=200, command=ts, orient='horizontal')
#s.grid(row=6, column=1)
#tesxt box
#txt = tk.Entry(width=10)
#txt.grid(column=1, row=8)
#gauge
p = tk_tools.Gauge(root, min_value=87.9,max_value=109.0, unit=' FM')
p.grid(row=0, column=1,sticky='nw')
p.set_value(0.0)
#zeven segment
z = tk_tools.SevenSegmentDigits(root, digits=5, background='light grey', digit_color='red')
z.grid(row=1, column=1,sticky='n')
z.set_value('8790')
x = 0
#leds
led = tk_tools.Led(root, size=20)
led.grid(row=0, column=0, sticky='NEW')
led.to_green(on=True)
led1 = tk_tools.Led(root, size=20)
led1.grid(row=0, column=0,sticky='ew')
led1.to_green()
led2 = tk_tools.Led(root, size=20)
led2.grid(row=0, column=0, sticky='sew')
led2.to_green()
#buttons           "Active Only
m = tk.Button(text="Mute - Radio ", command=mute_on_off)
m.grid(row=0, column=0, sticky='N')
B = tk.Button(text="Hold - Radio ", command=hold_on_off)
B.grid(row=0, column=0)
e = tk.Button(text="Manual  Tune", command=manual_on_off)
e.grid(row=0, column=0, sticky='S')
#q = tk.Button(text="Hold", command=tc)
#q.grid(row=9, column=0, sticky='N')
def callback(*args):
showinfo(title='Information', message=args)
o = tk.Label(root, text="Powered By Digital Dowsing")
o.grid(row=9, column=1)
o1 = tk.Label(root, text="Start Freq")
o1.grid(row=10, column=0)
o2 = tk.Label(root, text="Active Freq")
o2.grid(row=10, column=1)
o3 = tk.Label(root, text="Stop Freq")
o3.grid(row=10, column=2)
# handle event list box
def items_selected(event): # handle item selected event
selected_indices = listbox.curselection() # get selected indices
selected_langs = ",".join([listbox.get(i) for i in selected_indices])    # get selected items
msg = f'You selected: {selected_langs}'
showinfo(title='List Box', message=msg)
# Combo box
def changed(event):
""" handle the como changed event  12 """
g = 13
arduino.write(bytes(str(g), 'utf-8'))
time.sleep(1)
arduino.write(bytes(selected_v.get(), 'utf-8'))
time.sleep(.25)
# Combo box
def changed1(event):
""" handle the combo1 changed event 17 active tune send channel """
g = 17
arduino.write(bytes(str(g), 'utf-8'))
time.sleep(1)
arduino.write(bytes(selected_v1.get(), 'utf-8'))
time.sleep(.25)
# Combo box
def changed2(event):
""" handle the combo2 changed event 13 """
#showinfo(title='Freq Start', message=f'You selected {selected_v2.get()}!')
g =14
arduino.write(bytes(str(g), 'utf-8'))
time.sleep(1)
arduino.write(bytes(selected_v2.get(), 'utf-8'))
time.sleep(.25)
# create a combobox
selected_v = tk.StringVar()
cb = ttk.Combobox(root, textvariable=selected_v)
for h in range(8790,10810,20):
cb['values']= tuple(list(cb['values']) + [str(h)])
cb.current(0)
cb['state'] = 'readonly' # prevent typing a value
cb.grid(row=12,column=0)# place the widget
cb.bind('<<ComboboxSelected>>',changed)
# create a combobox#1
selected_v1 = tk.StringVar()
cb1 = ttk.Combobox(root, textvariable=selected_v1)
for h in range(8790,10810,20):
cb1['values']= tuple(list(cb1['values']) + [str(h)])
cb1.current(50)
cb1['state'] = 'readonly' # prevent typing a value
cb1.grid(row=12,column=1,sticky='EW')# place the widget
cb1.bind('<<ComboboxSelected>>',changed1)
# create a combobox#2
selected_v2 = tk.StringVar()
cb2 = ttk.Combobox(root, textvariable=selected_v2)
for h in range(10790,8770,-20):
# Add itmes in combobox through Loop code
cb2['values']= tuple(list(cb2['values']) + [str(h)])
cb2.current(0)
cb2['state'] = 'readonly' # prevent typing a value
cb2.grid(row=12,column=2,sticky='w')# place the widget
cb2.bind('<<ComboboxSelected>>',changed2)
# Creating Menubar
menubar = tk.Menu(root)
# Adding File Menu and commands
file = tk.Menu(menubar, tearoff=0)
menubar.add_cascade(label='File', menu=file)
file.add_command(label='Save', command=None)
file.add_separator()
file.add_command(label='Exit', command=root.destroy)
# Adding Help Menu
help_ = tk.Menu(menubar, tearoff=0)
menubar.add_cascade(label='Help', menu=help_)
help_.add_command(label='Ghostbox Help', command=None)
#help_.add_command(label='Demo', command=None)
help_.add_separator()
help_.add_command(label='About BB&B', command=None)
# display Menu
root.config(menu=menubar)
root.after(100, wtf)
root.mainloop()
Testing
- Download or paste the new code into the Arduino IDE editor.
- The IDE editor will compile the new sketch and upload it to your Arduino Ghost Box project.
- See the attached PDF in the reference section for additional tips on changing this code to alter functions.
- Download and run the python program gb.exe
- Note: you must have your Arduino Uno attached to your PC before starting the program
Looking Ahead to Installment 4
In the next installment, we will discuss adding a physical display and a switch to allow the GhostBox to run with all features seen using the software.
Installment 4 will be a late summer release.


